

TL;DR
You can build and publish an iOS app without knowing how to code:
Plan it with Claude: Pressure-test the idea, define the first version, and create a milestone-based build plan.
Design it with Claude Design: Turn the requirements into screens and prepare the files for development.
Build it with Claude Code: Give Claude Code the plan and design files, then let it create and run the app.
Test it: Open the app on your iPhone, test each milestone, and fix problems early.
Ship it: Build the production app, distribute it through TestFlight, and submit it to the App Store.
The basic workflow is simple: plan → design → build → test → ship.
Steps to Build and Publish an App
Note: This guide is written for Mac users publishing to Apple’s App Store. The same process works on Windows, but a few setup steps, like opening and using the command line, will be slightly different.
The distance between “I have an idea” and “it’s on my phone” feels enormous. Claude closes that gap enough for anyone to ship a working app to the App Store. This playbook walks through the process step by step, with each step designed to be practical and easy to follow.
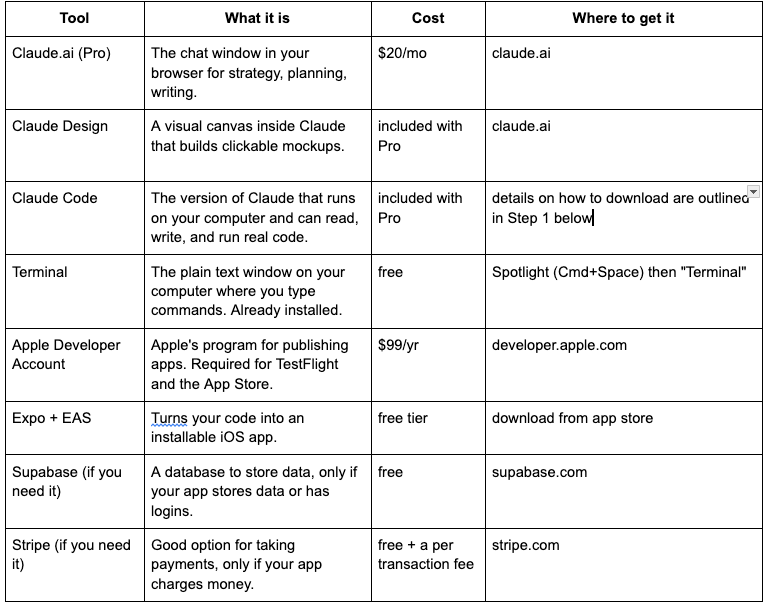
What you’ll need
Set these up before you write a single prompt. None of them require coding. It’s just clicking through onboarding flows, and getting it out of the way first keeps you in flow later.
Step 1: Install Claude Code
Here are the steps to install Claude Code onto your computer.
Install Node.js: Go to https://nodejs.org/en/download and click the macOS Installer (.pkg) button. Run it like you install any other software on your Mac: double-click, click through the prompts, done. (Node is what the Claude Code install command below runs on.)
Open the terminal: Press Cmd+Space, type “Terminal,” and hit Enter. A plain text window opens.
Install Claude Code: Paste this and hit Enter:
npm install -g @anthropic-ai/claude-code If you get a permission error, point npm at a folder you own, then install again:
npm config set prefix ~/.npm-global npm install -g @anthropic-ai/claude-codeIf you used that second version, run these two lines once so your terminal can find the claude command:
echo 'export PATH=~/.npm-global/bin:$PATH' >> ~/.zshrc
source ~/.zshrc
4. Type claude --version and hit Enter. A version number means you’re set. If it says “command not found,” close the terminal, open a fresh window, and try again.
Step 2: Develop your strategy (Claude chat)
Before any code, run a real analysis on your product idea, then turn it into a concrete list of what the app actually has to do. Open a fresh chat at claude.ai and treat Claude like a skeptical strategy consultant you’ve hired to poke holes in your idea.
The sequence that worked for me:
First, the pitch and the pressure test. Describe the idea in a few sentences, then ask for a full, skeptical analysis: who the customer is, who the competitors are, what the market looks like, why now, and what would most likely kill this.
Then, attack your own assumptions. After reading the first pass, push back on yourself. Ask what you might be wrong about and what the strongest version of the case against the idea looks like.
Next, pin down the requirements. Once you’ve settled on what you’re building and why, get specific about what the app actually has to do before you plan how to build it. Ask Claude to write the requirements for a first version: the core features, the screens the app needs and what each one does, the data it stores, and the rules that govern it, such as who can do what, what happens on sign-up and how the app works.
Finally, turn the requirements into a plan. With the feature list agreed on, ask Claude to turn it into a build plan that takes you from nothing to a real iOS app you can put in front of people, broken into three milestones. For each milestone, have it list the screens to build, the backend pieces, and the tests to run. Milestones are useful because they break a large app into smaller, testable stages.
Together, the requirements and the plan are your master spec. Copy the whole thing into a document you’ll keep returning to throughout the build.
Step 3: Design (Claude Design)
Now you turn your requirements into screens you can actually see.
Open Claude Design at claude.ai/design (or the palette icon in the desktop app). It’s part of your paid plan. Start a new project, separate from your Step 2 chat.
Then, one screen at a time:
Give it a style reference. Drop in some mobile design examples so Claude knows what good design looks like. Figma’s Community has plenty to pull inspiration from: https://www.figma.com/community/mobile-apps
Paste in your milestone plan from Step 1. This tells Claude which screens to make and what goes on each.
Ask for the designs. Describe your brand, colors, fonts, and overall mood. Ask for a few versions so you can compare.
Refine. Tell it what to change (spacing, headline size, fonts) until the screen looks right. This takes a few rounds. That’s normal.
Repeat for every screen (welcome, onboarding, main view, paywall, settings).
Ask for the handoff. Once the screens look right, tell Claude Design to package everything for Claude Code: “Now create a prompt I can use in Claude Code, along with the downloaded files, to build these screens.”
That handoff will usually give you a downloadable folder with everything inside:
PROMPT.md — the prompt you’ll paste into Claude Code to build the screens.
README.md — the full spec: layout, components, colors, fonts, and copy.
The design files — your screens as an HTML file you can open in a browser, plus the stylesheet.
Before you leave Claude Design, download the folder and unzip it.
Step 4: Build (Claude Code)
This is where the mockups become a real app on your phone. It all happens in the terminal, where you’re talking to an AI engineer that can read, write, and run code on your machine.
Getting started:
Open a terminal: On a Mac, press Cmd+Space, type “Terminal,” hit Enter. A window with a blinking cursor appears.
Make a project folder: type mkdir myapp, then cd myapp to step inside it. Nothing visible changes, but you’re now “in” the folder. (”myapp” is just the folder name. Call it whatever you like.)
Take the files you unzipped in Step 3 and drop them manually into your new myapp folder that you just created, so everything sits in one place.
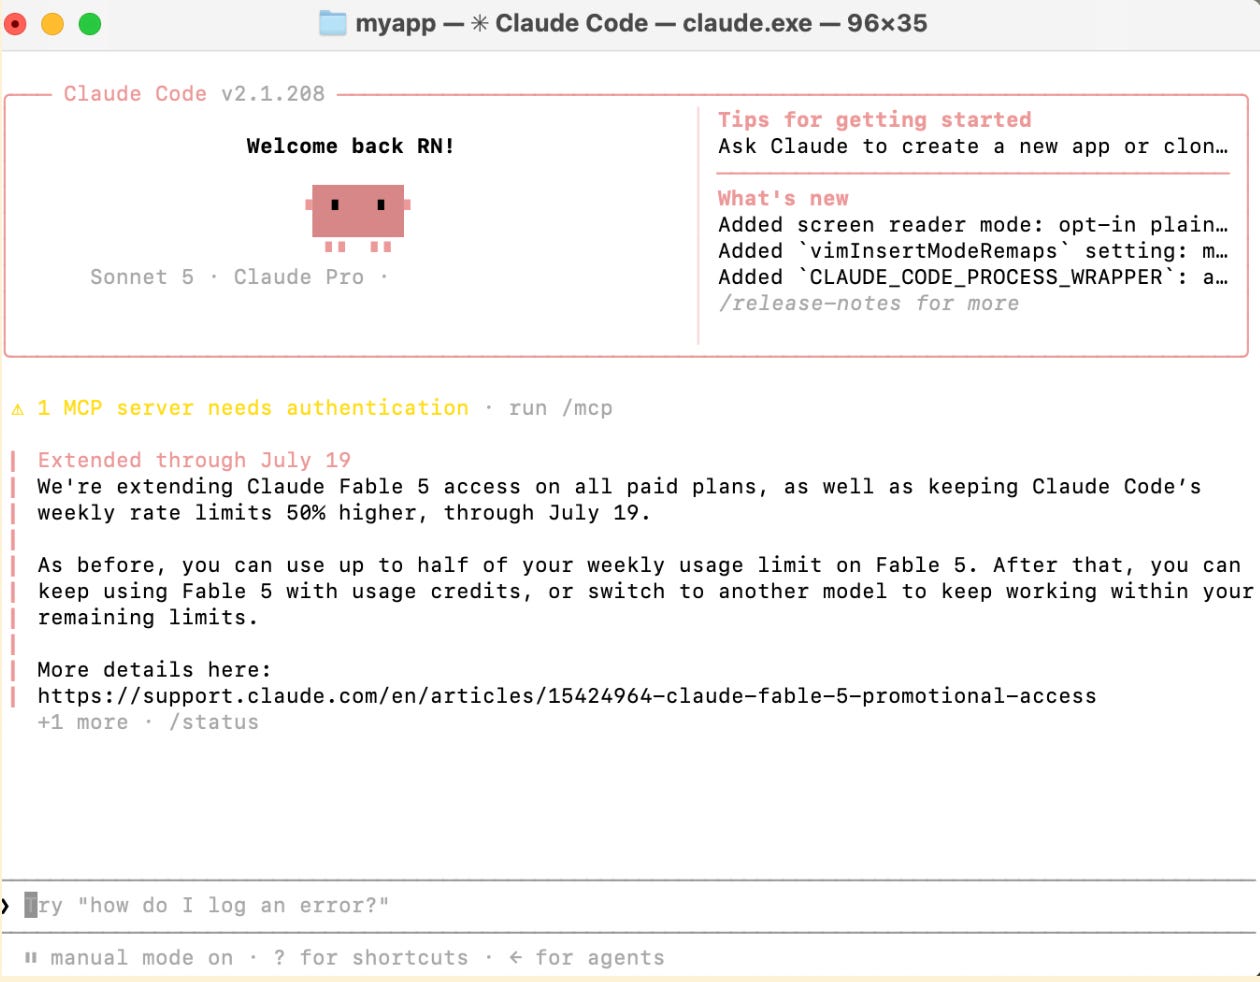
Launch Claude from inside that folder: type claude and hit Enter. It greets you right there in the terminal. Then give it this:
"Read PROMPT.md and README.md in this folder, then follow PROMPT.md to build the app."Claude Code runs the actual commands in front of you, installs everything, builds the app, and stops.
Step 5: Get it onto your phone
You don’t really know what you’ve built until it’s in your hand. Here are the steps to test the app on your phone.
Install Expo Go from the App Store. It runs your code on your phone in dev mode.
In a new terminal window (Cmd+Space, type “Terminal,” hit Enter), run:
npx expo start --tunnelIt prints a QR code.
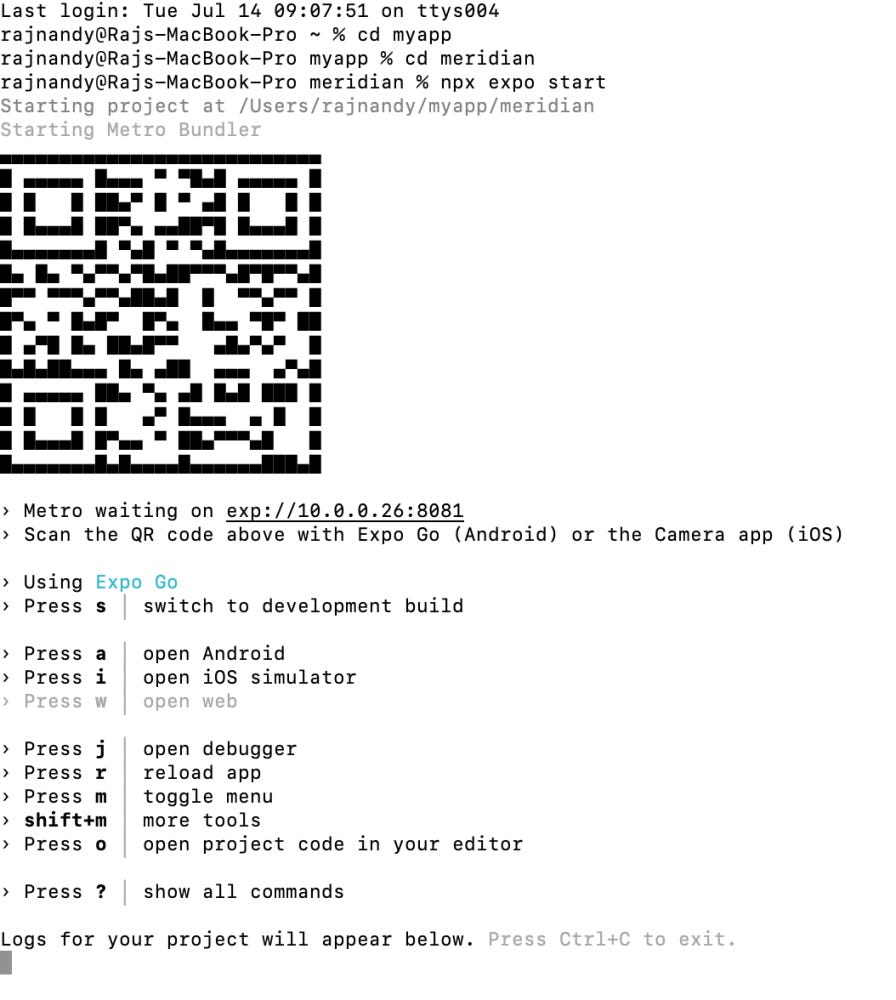
3. Scan the QR code with your phone’s camera. Expo Go opens with your app inside it.
That’s how you test the app as you build.
Step 6: Ship it to TestFlight and the App Store
This is the final stretch: moving your app off your computer and onto a real phone—first through TestFlight, Apple’s testing platform, and then through the App Store.
Before you begin, make sure you have the two accounts listed in the setup section:
Apple Developer Program: $99 per year. Approval may take anywhere from a few hours to a couple of days, so register early.
Expo account: Free.
Most of the technical work happens through EAS, Expo’s cloud build service. EAS builds your iOS app on Apple hardware in the cloud. Let EAS manage the certificates for you. Signing is one of the most confusing parts of iOS development for beginners, and EAS handles most of it automatically.
Building and uploading your app. Run these commands from inside your project folder in Terminal. In Terminal you use the cd command (”change directory”). Since you made your project in the myapp folder back in Step 4, you go there with:
cd myappInstall EAS and log in: (this is your Expo login and password)
npm install -g eas-cli
eas login
Prepare the project:
eas build:configureThis is a one-time setup that tells EAS how to build your app. It’ll probably ask you for a bundle identifier during setup. A bundle identifier is a unique ID Apple uses to tell your app apart from every other app in the world. It looks like a website address in reverse: com.yourname.yourapp. You set it once and it’s permanent, so pick it now.
Build the app in the cloud:
eas build --platform iosIt asks you to sign in with your Apple account, handles the certificates, and hands you a finished build.
Send the build to Apple:
eas submit --platform iosAfter ten to thirty minutes of Apple processing, the build appears in App Store Connect under TestFlight.
Testing on TestFlight. TestFlight is Apple’s tool for trying your app on real phones before it goes public. The quickest way is to add yourself and a few people as testers by email. You all get the app right away, no waiting. To share more widely, TestFlight lets you invite up to ten thousand people through a public link. Then actually use the app, and get a few others to use it too. This is where you catch the things that only show up on a real phone in real use: the sign-up that fails, the screen that loads blank, the button that goes nowhere.
Submitting to the App Store. TestFlight only tests, it doesn’t publish. To actually go live, you fill out your store listing in App Store Connect and submit it for review. Here’s the whole path:
Go to appstoreconnect.apple.com and sign in. Click Apps, then the blue plus button, then New App.
Fill in the basics: platform (iOS), your app’s name (it must be unique across the entire App Store), primary language, the bundle identifier you set earlier, and an SKU (any short code you make up for your own records, like app001).
Add your screenshots. Apple requires them at set sizes, the 6.9-inch iPhone size is mandatory, plus iPad sizes if your app supports iPad. These are your storefront, so make them count.
Write the listing text: a description, keywords, your category, and a support URL (a webpage people can reach you at, even a basic one).
Fill in privacy details. You must provide a privacy policy URL and answer a questionnaire about what data your app collects and why.
Set the age rating by answering a short content questionnaire.
Attach your build. The one you uploaded with eas submit will be waiting under the build section once TestFlight finishes processing it. Select it.
Click Submit for Review.
Then you wait. Apple’s review usually takes one to three days. Once approved, your app will be published on the App Store.
Don’t panic if you’re rejected. Most first submissions bounce once over something small: a missing permission sentence, a support link that doesn’t load, or placeholder text left in by accident. Apple tells you the exact reason. Fix what is needed and resubmit. You don’t have to start over.
The gap between an idea and a real app on your phone is smaller than it looks. It mostly comes down to doing things in the right order: pick the idea, argue it out, design it, build it screen by screen, and get it in your hand early and often.